Looking Good Without Makeup: How to Wake Up Looking Flawless + Spend Less Time on your Makeup Routine
Tuesday, January 23, 2018
Makeup, makeup, makeup - Do you
still remember the moment as a young girl that you first thought about putting
on makeup? Perhaps it was an advertisement, or you were rifling around your
mom's drawers without permission. As a female, makeup definitely impacted you a
way or other while you were growing up - suddenly, there was a way to cover up
your imperfections and look better. As the years went by, you slowly developed
a makeup routine that you're comfortable with, and boy oh boy - it takes a
while to put "your best face" forward! Have you always wanted to walk
out of your house again, wishing for your baby smooth skin that you had upon a
time, or simply not waking up in the wee hours of the morning to prep yourself?
Today, I’m going to talk about 5 things that is going to help you
look flawless without makeup – these are actionable steps, products and yes,
even procedures that you can undertake to achieve that flawless selfie, sans
makeup. There are literally tons of tips out there, but some are as vague as saying
exercise, diet and sleeping habits that clear up your skin. These definitely
work but they’re not as impactful as what I’m going to reveal to you in this
post! (OK, sounding a little like a self-help guru asking for your money, but
bear with me here, these are 5 things I discovered over the course of a few
years that I’m sharing to my blog readers for free.)
These will be tips that will allow you to step out of your house without
makeup, or drastically reduce the time you spend on your makeup routine every
day, thus freeing up more snooze time. They’ll also help you to increase your
confidence and worry less about how your makeup looks at any given time of the
day… because you will be wearing none!
Step 1: Embroider Your Eyebrows!
Eyebrows are important to your face because it frames your
features and opens up your eyes. Embroidering (not tattooing!) them will save
you 15 minutes each day off your makeup routine as your brows will look like
they’re perpetually drawn, giving you a polished look even if you’re not
wearing makeup at other parts of your face.
I got my eyebrows done at CHARME at Far East Plaza. I opted for
the ombre, diffused eyebrows because they fill in your brows more, fade away
less and last longer (around 2 years, depending on the person). Although it’s
slightly pricier than the normal eyebrow embroidery, the diffused ombre eyebrow
uses a different technique that looks much closer to a drawn, feathered eyebrow
than the normal embroidery, which draws “lines” in your eyebrow to mimic the
appearance of brow hairs.
(The following is a mini-review of the eyebrow embroidery at
Charme, skip this if you want to read the next tip on achieving a no-makeup
look):
The process itself is fairly straightforward – I called the same
day to make an appointment, and while arriving at the salon, Charme, which also
doubles up as a nail parlour, I was asked to sign some forms. Next, the
beautician proceeds to fill in your brows with a pencil and gel liner – this helps
her to visualize how your embroidered eyebrows would look like and also act as
a guide while she’s actually embroidering them. This takes around 15 minutes,
after which numbing cream is applied. Next, you go to a small room and lie
down. Then comes the scary part, the embroidery process. Because this is the
diffused, ombre eyebrow, the embroidery process is slightly different. Instead
of dipping the embroidery knife in the ink and cutting it into your skin (which
is the main process of eyebrow embroidery), the beautician instead “draws on”
your brows with small, stabbing motions with the embroidery tool on your brow
bone. It’s like modern day beauty Pointilism. Sounds terrifying? Thankfully the
numbing cream took the most part of the pain away and you’re mostly left with
the strange feeling of something jabbing your eyebrow repeatedly.
Not going to lie, the process is not painless and might even be
painful to someone with a low threshold of pain, but hey, no pain, no gain
right? Plus remember that you won’t have to draw your brows (or at most, only
touch them up with a pencil minimally) for the next two years. 15 minutes a day
spent on drawing your eyebrows * 365 days = ~91.25 hours or 3.8 days saved in
total every year of the 2 years the embroidery is in place!
They might ask you to buy 2 sessions of the embroidery as after
the 1st session, a thin scab forms on your eyebrows that falls off
over the course of the next week – some of the ink might come off as well. You are
given an anti-inflammatory gel to apply daily that is an additional ~$20. I
only bought 1 session and I’m quite satisfied with how my eyebrows turned out –
the colour did not drop off or become patchy. Note: Your eyebrows will appear
much dark but after 1-2 weeks they return to the actual colouring.

Here you can see the before and after of my embroidery.

Here you can see the before and after of my embroidery.
Step 2: Perm Your Eyelashes!
Eyelash perms and eyelash extensions – I’ve done them both but I prefer
the former. The reason why you could go for this is to make your eyelashes more pronounced, and in doing so, enhancing your eyes and opening them up. This means no matter which option you choose, your eyelashes would look like they're curled and brushed with mascara without the associating effort. This is a way to look extra alluring with seemingly longer and more pronounced lashes, giving you a more polished look.
(Skip to following as it's a mini-review of the Keratin Lash Lift with My Beauty Recipe located at Orchard Gateway Basement.)
I came across this treatment while browsing Facebook and it was one of the suggested ads for me. At first I was pretty sceptical - the before and after photos look really different. The result of this treatment is almost as if you've done eyelash extensions - longer, much much much perkier eyelashes. With some additional money, you can even add semi-permanent mascara. I opted for the Lash Lift without the semi-permanent mascara. The process itself took around an hour and half and was pretty simple. Basically you lie on the bed and the beautician applies a cream to your eyelids, and flip your eyelashes onto the eyelids so that they adhere to the layer of cream. The effect is such that your eyelashes are curled without needing to add extensions. My eyes did feel slightly sore after from the cream as it gave them a stinging sensation, but it wore off within the next 1h.

Disclaimer: This is a photo of the before and after I got off Google. My actual results were similar, with many of my friends and family asking if I was wearing false eyelashes or had a eyelash extension when I met them.
Sadly it has been about a month and the effects of the lash lift is wearing off - I'm noticing that my lashes are becoming droopy again, but for that 1 month the lash lift was definitely worth it for the price. This saves you 30 minutes which you would otherwise spend before a big night out, gluing on your falsies!
Lash Perm Vs. Lash Extensions - I definitely prefer a lash perm. The effects of the keratin lash perm and lash extensions are actually very similar, but there are so many downsides to the latter. Extensions not only take more than 2-3 hours to put on, they also look very gross when they're growing out, with chunks of lashes missing in your lash line, or even looking like a shedding bush with the lashes twisting and turning in all sorts of directions. And I'm sure you know how itchy eyelash extensions can be while growing out. Not ot mention the fact that it becomes so troublesome to wash your face because you have to clean around your eyelashes! Lash perms are much easier, faster and fuss-free and the price is a fraction of a cost.
This step will be integral to makeup-free, glowy skin and rolling out of bed looking like you've already having a face full of foundation on... but not. But really Sasha? Facials? Are you trying to sell me a product here? Trust me, I used to be like you - my mother is very adamant that most beauty products and treatments are shams and has brainwashed me from a young age that beauty facials are just a waste of time and money. Long story short, I recently went for my first ever facial and I was sold immediately. For more info read my review of my facial place HERE.) I'm going to give you a mini-summary of why beauty facials is a must have in every girl's upkeep arsenal.
BEFORE: I've always wondered how some girls on the streets for Singapore can walk around with such beautiful, porcelain-like skin. I would be sad at my comedone-prone skin, which looks alright from afar but look terribly bumpy while on the HD camera. My skin was also dull from the grime accumulated in my skin and my lack of a proper beauty regime.
AFTER: I've bought a package with New York Skin Solutions and it has been going well. My comedones are 75% gone and my skin is much fairer and dewier. I've gotten so many compliments about it too. My cousin even recently asked if I've done anything to my skin because it's so much smoother and whiter.

This makes me a 100% believer in beauty facials and the power of regular facial cleansing. It also helps that the beauticians at NYSS treat your skin with different concoctions every time you arrive for a facial and they follow a skincare treatment plan for you. This helps to improve your skin over the course of a few months. Sounds really good? Don't get me wrong, there are certain detractions of facials - you should always do your reading since facial packages don't come cheap, so to be avoid getting ripped off, please do your homework.
(Skip to following as it's a mini-review of the Keratin Lash Lift with My Beauty Recipe located at Orchard Gateway Basement.)
I came across this treatment while browsing Facebook and it was one of the suggested ads for me. At first I was pretty sceptical - the before and after photos look really different. The result of this treatment is almost as if you've done eyelash extensions - longer, much much much perkier eyelashes. With some additional money, you can even add semi-permanent mascara. I opted for the Lash Lift without the semi-permanent mascara. The process itself took around an hour and half and was pretty simple. Basically you lie on the bed and the beautician applies a cream to your eyelids, and flip your eyelashes onto the eyelids so that they adhere to the layer of cream. The effect is such that your eyelashes are curled without needing to add extensions. My eyes did feel slightly sore after from the cream as it gave them a stinging sensation, but it wore off within the next 1h.
Disclaimer: This is a photo of the before and after I got off Google. My actual results were similar, with many of my friends and family asking if I was wearing false eyelashes or had a eyelash extension when I met them.
Sadly it has been about a month and the effects of the lash lift is wearing off - I'm noticing that my lashes are becoming droopy again, but for that 1 month the lash lift was definitely worth it for the price. This saves you 30 minutes which you would otherwise spend before a big night out, gluing on your falsies!
Lash Perm Vs. Lash Extensions - I definitely prefer a lash perm. The effects of the keratin lash perm and lash extensions are actually very similar, but there are so many downsides to the latter. Extensions not only take more than 2-3 hours to put on, they also look very gross when they're growing out, with chunks of lashes missing in your lash line, or even looking like a shedding bush with the lashes twisting and turning in all sorts of directions. And I'm sure you know how itchy eyelash extensions can be while growing out. Not ot mention the fact that it becomes so troublesome to wash your face because you have to clean around your eyelashes! Lash perms are much easier, faster and fuss-free and the price is a fraction of a cost.
Step 3: Going for Facial Treatments!
BEFORE: I've always wondered how some girls on the streets for Singapore can walk around with such beautiful, porcelain-like skin. I would be sad at my comedone-prone skin, which looks alright from afar but look terribly bumpy while on the HD camera. My skin was also dull from the grime accumulated in my skin and my lack of a proper beauty regime.
AFTER: I've bought a package with New York Skin Solutions and it has been going well. My comedones are 75% gone and my skin is much fairer and dewier. I've gotten so many compliments about it too. My cousin even recently asked if I've done anything to my skin because it's so much smoother and whiter.
This makes me a 100% believer in beauty facials and the power of regular facial cleansing. It also helps that the beauticians at NYSS treat your skin with different concoctions every time you arrive for a facial and they follow a skincare treatment plan for you. This helps to improve your skin over the course of a few months. Sounds really good? Don't get me wrong, there are certain detractions of facials - you should always do your reading since facial packages don't come cheap, so to be avoid getting ripped off, please do your homework.
Step 4: Finding the Skincare Routine that Suits You!
This actually takes a lot of trial-and-error, but with the vast improvement that the beauty facials are doing for your skin and how now you don't need as much foundation before walking out of the house, the skincare routine is important but play less of a part as your skin condition is already improved.
At the end of 2017 I saw a lot of ads from beauty bloggers and influencers of this "Lancome Sensitive Genifique" and I was intrigued, because my Laniege Waterbank Essense wasn't really working well anymore. The good thing was that they had a special sample that you could pick up from the stores and also a sit-in facial that the store assistant will apply for you. After using Lancome's Sensitive Genifique for 4 days, I noticed a marked improvement in my skin texture and also brightness. The product also has anti-aging properties, which become important as you reach your post-25s as that's when you should start your anti-aging regimes!

From the Lancome USA Website:
What it is: A dual antioxidant serum boosted with pure Ferulic Acid and pure Vitamin E that is self-activated, mixing automatically inside a soothing base of Centella Asiatica to instantly calm distressed skin and protect against environmental aggressors like pollution, infrared radiation, and UVA rays for visibly healthy-looking skin.
What it does: Oftentimes, environmental factors such as weather, travel, change of seasons, stress, and pollution can cause fragility on skin’s surface. This fresh serum instantly soothes skin sensitivities, such as tightness, overall discomfort, and itchiness and redness due to dryness, and provides antioxidant protection against future environmentally-triggered skin discomforts. Over time, this serum featuring a synergistic antioxidant combination of pure Ferulic Acid and pure Vitamin E, helps strengthen skin against free radicals induced by UVA rays, infrared radiation, and pollution, which may lead to visible signs of accelerated skin aging, improving the look of skin for a healthier-looking complexion.
93% agreed skin was comforted instantly - Clinically tested to provide a significant protective effect against pollution fine particles - Clinically tested to provide +80% increase in skin’s anti-pollution protection Based on clinical and self-assessments.
I have sensitive skin which tends to become oily. I've found a good combination which keeps my skin oil-free and soothed at the same time, without the need for makeup to cover the redness. The combination of facials and skincare routine should reduce the oiliness in your pores by a great margin.
What I do is to use Cetaphil's Gentle Skin Cleansing Cloths (they're makeup removal face wipes) when my face gets oily throughout the day, and I follow up with Avene's Eau Thermale Thermal Spring Water Facial Spray (it's soothing and anti-irritating, for sensitive skin). The latter does a great job of keeping your face slightly moisturized without being oily and also has a slight tightening effect. With the combination of both, it keeps your skin looking matte for 2-3h before you need to spray the spring water again.

So, if after all this you still aren't satisfied with your skin and require makeup for that extra mile, there's a secret trick to achieving long lasting foundation. I'm sure a lot of you would have experienced this - your foundation sliding or becoming patchy when your face turns oily over the day. I personally use Laneige's BB Cream Cushion, and although the texture is perfect, I could never get it to stay on my face. Enter Boxing Day, when I redeemed my free makeover at Sephora - the beauty assistant used this makeup primer on me that enabled my foundation to stay over dinner, drinks and clubbing - a full 8h!!! The brand is called it and the name of the primer is Bye Bye Pore Primer. I swear this primer has changed by makeup routine by so much - it is now a staple that I use every time I put on foundation.

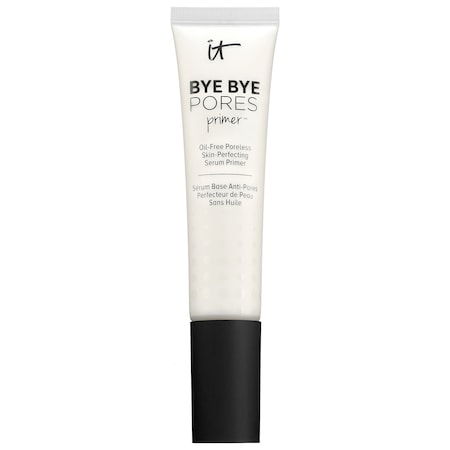
More about IT's Bye Bye Pore Primer: Developed with plastic surgeons, this revolutionary, pore-erasing, antiaging skin perfector blurs the look of pores, fine lines, wrinkles, and uneven texture while hydrating and supporting skin health. Infused with powerful skin-loving ingredients including Moroccan lava clay, purifying charcoal, papaya fruit extract and hydrolyzed collagen—plus exclusive Bye Bye Pores Optical Blurring Technology™—the velvety, lightweight formula glides on effortlessly to neutralize, correct, minimize shine, and create a smooth barrier for airbrushed makeup application. Non-clogging, oil-free, and translucent, it’s also perfect for all skin types and tones.
A trick going to Sephora is that they have a 15 minute free makeover service. Use that time to try on new products, which the beauty assistants aren't paid commissions to sell. For my case, I was redeeming a free makeover because I spent a certain amount of money in their promotional campaign. Usually in those cases the beauty assistants will recommend you products that suit your skin type and also do a live demonstration, so take advantage of that and treat it as a way of discovering new products.
So, after primping your eyebrows, eyelashes and priming your face with facials, essence and skincare, your skin should see a dramatic improvement in over 2-3 months. The basics, like diet, exercise and sleeping habits should be used to enhance your health and wellbeing, which also play a part in transforming your skin. I hope this post was informative in giving you some tips on how to walk out of the house without makeup and being your most confident self. Let me know if these tips work for you and what else should I write about in the comments below. Toodles!
Here are some bonuses steps to achieve your no makeup look! You can try semi-permanent makeup.
1) BB Glow Skin Facial - See my review here: https://speaktomeinkisses.blogspot.com/2018/08/the-secret-to-korean-glass-skin-my.html
2) Semi-permanent Lip Embroidery
3) Eyeliner Embroidery
4) Blusher Embroidery
From the Lancome USA Website:
What it is: A dual antioxidant serum boosted with pure Ferulic Acid and pure Vitamin E that is self-activated, mixing automatically inside a soothing base of Centella Asiatica to instantly calm distressed skin and protect against environmental aggressors like pollution, infrared radiation, and UVA rays for visibly healthy-looking skin.
What it does: Oftentimes, environmental factors such as weather, travel, change of seasons, stress, and pollution can cause fragility on skin’s surface. This fresh serum instantly soothes skin sensitivities, such as tightness, overall discomfort, and itchiness and redness due to dryness, and provides antioxidant protection against future environmentally-triggered skin discomforts. Over time, this serum featuring a synergistic antioxidant combination of pure Ferulic Acid and pure Vitamin E, helps strengthen skin against free radicals induced by UVA rays, infrared radiation, and pollution, which may lead to visible signs of accelerated skin aging, improving the look of skin for a healthier-looking complexion.
93% agreed skin was comforted instantly - Clinically tested to provide a significant protective effect against pollution fine particles - Clinically tested to provide +80% increase in skin’s anti-pollution protection Based on clinical and self-assessments.
Step 5: Soothing the Skin on a Daily Basis
What I do is to use Cetaphil's Gentle Skin Cleansing Cloths (they're makeup removal face wipes) when my face gets oily throughout the day, and I follow up with Avene's Eau Thermale Thermal Spring Water Facial Spray (it's soothing and anti-irritating, for sensitive skin). The latter does a great job of keeping your face slightly moisturized without being oily and also has a slight tightening effect. With the combination of both, it keeps your skin looking matte for 2-3h before you need to spray the spring water again.
BONUS: Keeping your Foundation On Over Oily Skin
More about IT's Bye Bye Pore Primer: Developed with plastic surgeons, this revolutionary, pore-erasing, antiaging skin perfector blurs the look of pores, fine lines, wrinkles, and uneven texture while hydrating and supporting skin health. Infused with powerful skin-loving ingredients including Moroccan lava clay, purifying charcoal, papaya fruit extract and hydrolyzed collagen—plus exclusive Bye Bye Pores Optical Blurring Technology™—the velvety, lightweight formula glides on effortlessly to neutralize, correct, minimize shine, and create a smooth barrier for airbrushed makeup application. Non-clogging, oil-free, and translucent, it’s also perfect for all skin types and tones.
A trick going to Sephora is that they have a 15 minute free makeover service. Use that time to try on new products, which the beauty assistants aren't paid commissions to sell. For my case, I was redeeming a free makeover because I spent a certain amount of money in their promotional campaign. Usually in those cases the beauty assistants will recommend you products that suit your skin type and also do a live demonstration, so take advantage of that and treat it as a way of discovering new products.
Conclusion
BONUS: November 2018
1) BB Glow Skin Facial - See my review here: https://speaktomeinkisses.blogspot.com/2018/08/the-secret-to-korean-glass-skin-my.html
2) Semi-permanent Lip Embroidery
3) Eyeliner Embroidery
4) Blusher Embroidery


1 commentors
ReplyDeleteReally Good tips and advises you have just shared. Thank you so much for taking the time to share such a piece of nice information. Looking forward for more views and ideas, Keep up the good work!
Lash lift surry hills